Contents
Editing Tutorial
6 steps to make a Raw page to become a scanlated page:
- Rotating and Cropping
- Leveling
- Cleaning
- Adding Text
- Styling Text
- Resizing and Exporting
Always save and keep PSD files until a project is archived: File → Save As → File Type: PSD → Save((If you're recording this action, do not change the file name, otherwise all of your saved files later on will be changed to this name.))
How to make your editing process as fast as possible:
- For each step above, do it for all pages before proceeding to the next step. Except step 6 can be done right away for any image that finished step 5.
- Arrange Photoshop window workspace and layers efficiently.
- Record Photoshop Actions.
- Use Shortcut Keys.
Workspace:
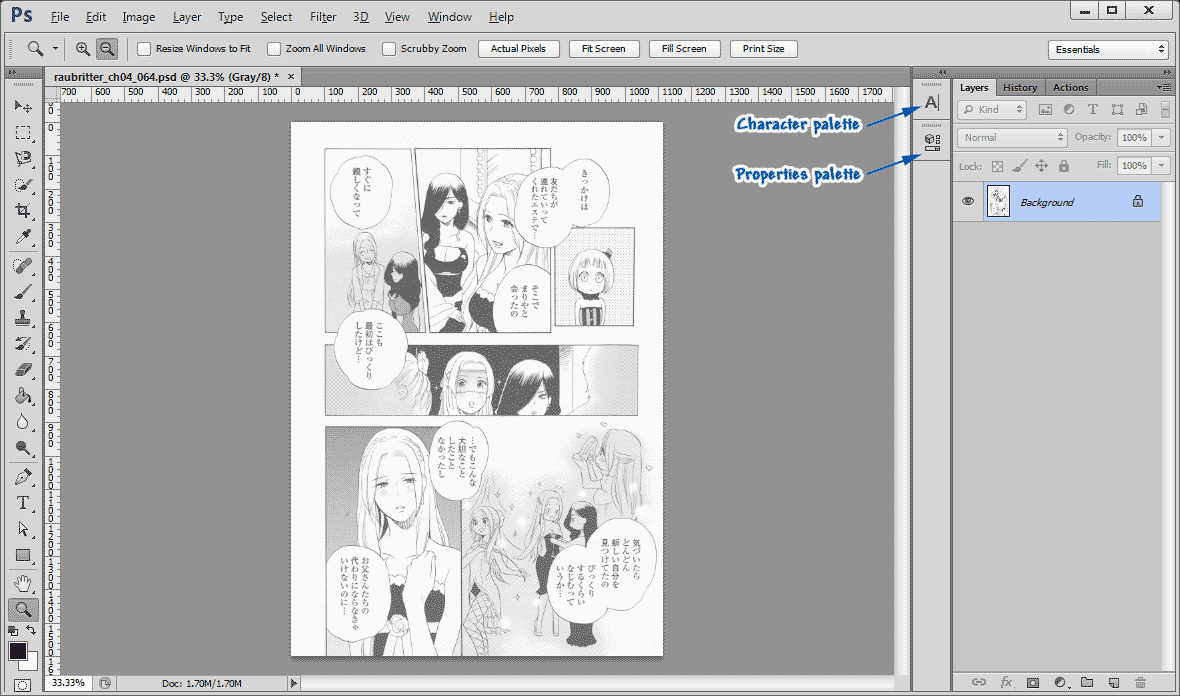
Besides the Tool boxes on the left, we need 5 more palettes on the right: Layers, History, Actions, Characters, Properties. Open these 5 palettes by going to Window in the Menu bar. To stick these palettes on the right, hold and drag them over to Photoshop window's right edge.
Actions:
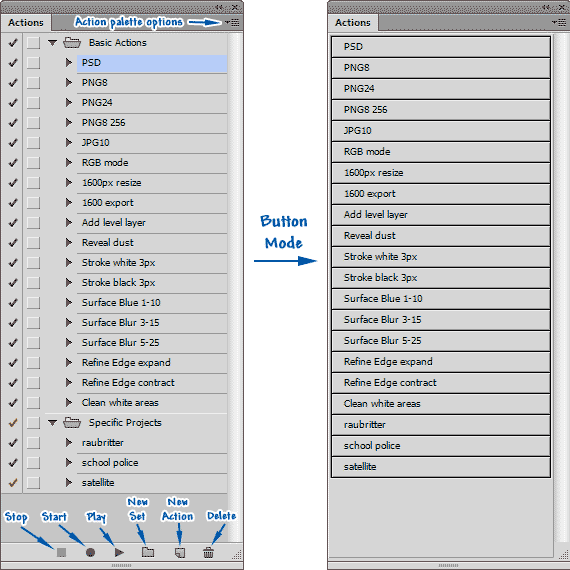
In the Actions palette, you can record something you do in Photoshop. When you need to repeat the same thing again for a different image or layer, all you have to do is press an action button. "Start" and "Stop" is for recording. "Play" is to enact the selected action. If you go to Actions palette Options, you can choose "Button Mode".
All underlined text in this guide indicate actions that you should record. Pay attention to where you should start and stop the recording session, just follow the underline exactly.
If you need to apply an action for many images in a folder: File → Automate → Batch. From here on it's very straightforward.
Shortcut Keys:
Tools |
Zooming |
Colours |
Actions |
V: move tool |
Alt + Mouse Wheel |
D: default colours (foreground black, background white) |
Ctrl + D: deselect |
M: marquee tool |
Ctrl + "+"/"-" |
X: swap foreground and background colours |
Ctrl + Shift + I: invert selection |
L: lasso tool |
|
Ctrl + Backspace : fill with background colour |
Ctrl + J: duplicate layer |
W: quick selection tool |
[ : decrease Eraser/Clone Stamp/Brush size |
Alt + Backspace : fill with foreground colour |
Ctrl + G: group layers |
I: eyedropper/ruler tool |
] : increase Eraser/Clone Stamp/Brush size |
|
Ctrl + A: select all |
C: crop tool |
|
|
Ctrl + T: free transform |
B: brush tool |
|
|
Ctrl + E: merge layers |
S: clone stamp tool |
|
|
Ctrl + Z: undo |
E: eraser tool |
|
|
Ctrl + C: copy |
T: type tool |
|
|
Ctrl + V: paste |
Z: zoom tool |
|
|
Delete: open Fill dialogue (see Content-Aware section) |
Comprehensive list of what manga editors use almost all the time.
1. Rotating and Cropping
Image Mode
Check the mode of your image (Image → Mode). If it's Grayscale or RGB, proceed to do rotation. If it's Indexed, then Image → Mode → click on RGB. This is important because if your Raw is in Indexed mode, you will break the pixels with rotating, resizing, and can't alias your text when typing. Do not change Indexed images into Grayscale or else the image will be darkened upon exporting.
Rotating:
See any straight line that are supposed to be horizontal or vertical in your Raw page? Use the Ruler Tool to drag a line along that one, then: Image → Image Roration → Arbitrary → click OK.
Cropping
Use the Crop Tool (C) to crop out black areas outside the Raw page. Do not over-crop. Do not crop out the white areas that belong to the page either. In short, try to keep the image as close to how the physical page looks like as possible.
Background Copy
After rotating and cropping, Ctrl + J to duplicate the Background layer, then turn off the visibility of this copy. Always keep Background Copy on top of all other layers. It is your Raw comparison source, as well as where you'll copy off parts of the image in case you screw up during editing the Background ((turn on the Background Copy visibility, select the part you want to recover, Ctrl + C → Ctrl + V to copy it into a new layer, then reorder this new layer under the Leveling layer)). From now on, you can do most of the edits directly on Background layer.
2. Leveling
In this step, we make black areas black, white areas white, and remove dust.
Leveling Layer:
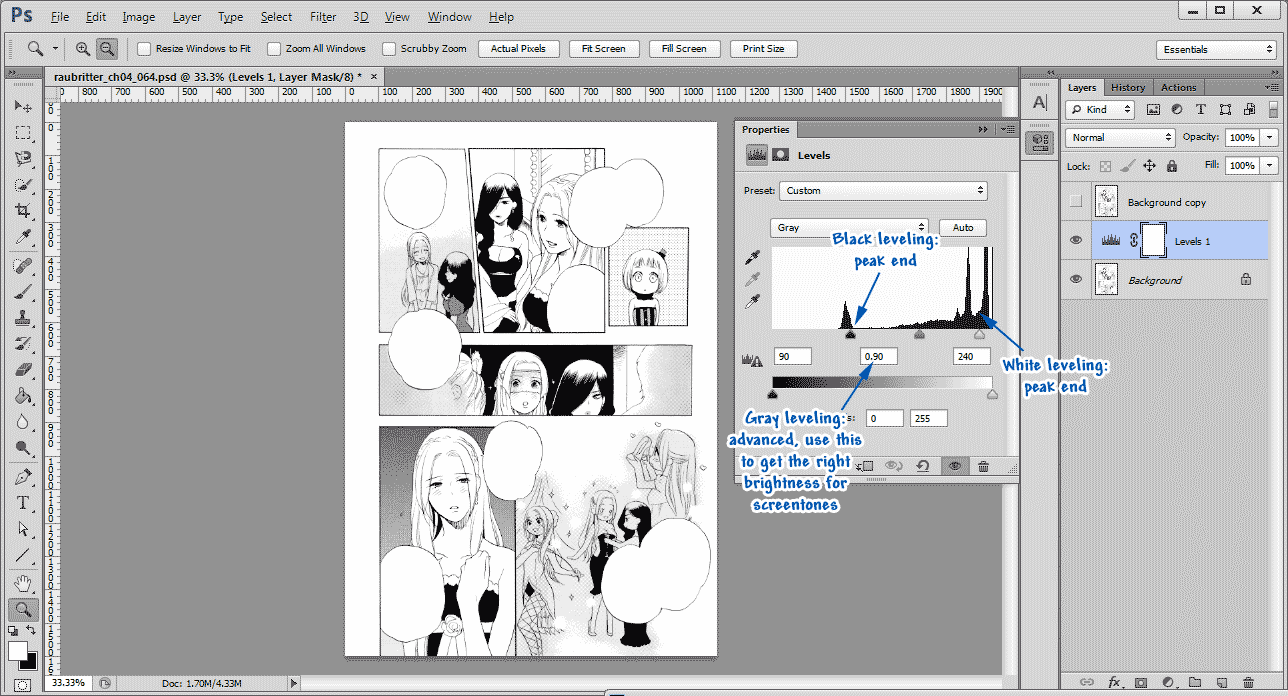
Select the Background layer → Layer → New Adjustment Layers → Levels. This is where the Properties palette comes to use. Slide the black and white bar just enough to get the black and white areas perfect. Do not overlevel. It's always better to be underleveled than the other way around. Advanced: when you've gotten more experiences, start to play around with gray leveling, and for trickier Raws, use two leveling layers instead of one.
Reveal Dust:
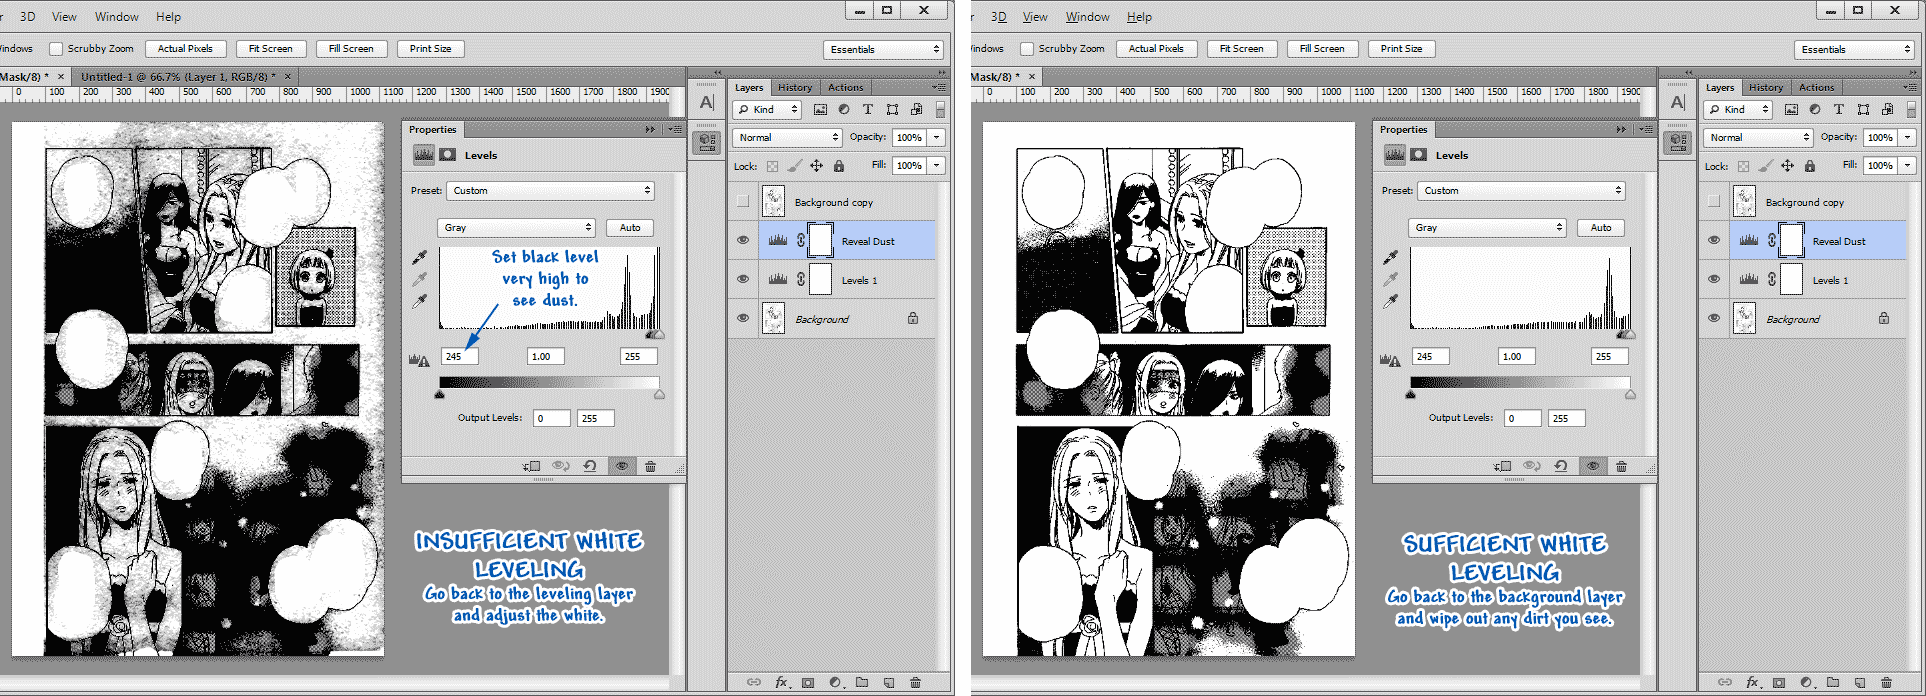
Select the Leveling Layer you made in the step above → Layer → New Adjustment Layers → Levels → slide the black bar all the way to the right → click on Background Layer. This will make all dust visible for you to wipe off, as well as an indicator whether your White Leveling was good enough. A good White Leveling should only leave a handful of dirt spots to be cleaned. After you corrected your white level and finished cleaning dust, either turn the Reveal Dust layer's visibility off or delete it.
Surface Blur
Only do this in 3 cases: Raws that have very rough paper texture; Raws that have way too many dirts; Raws that have slight JPG artifacts ((often seen in official webcomic)). With the first two, you can't get perfect black/perfect white areas unless overleveling them. In the third case, a simple Surface Blur will get rid of the artifacts so you don't need any leveling step at all. Select the Background layer → Ctrl + J to duplicate the current selected layer → Filter → Blur → Surface Blur → choose the appropriate radius and threshold → OK. I keep 3 records of this action: "Surface Blur 1-10" ((for artifacts)), "Surface Blur 3-15" and "Surface Blur 5-25" ((for dirt and texture)). This action is done on a copy instead of the selected layer because you might want to erase some parts that you don't want to blur.
Regularly check back with the Raw ((turn on the visibility of the duplicated layer on top)) to make sure your leveling and blurring didn't elimanate too many details and gradients.
3. Cleaning
In this step, we remove the Japanese text and SFX, and redraw missing parts. You can clean and redraw directly on the Background layer.
Remember that for difficult SFX (SFX on a very complicated background), you should arrange the translated SFX on top of it smartly and only redraw the parts that aren't covered. This saves you a lot of time.
Selection Tools:
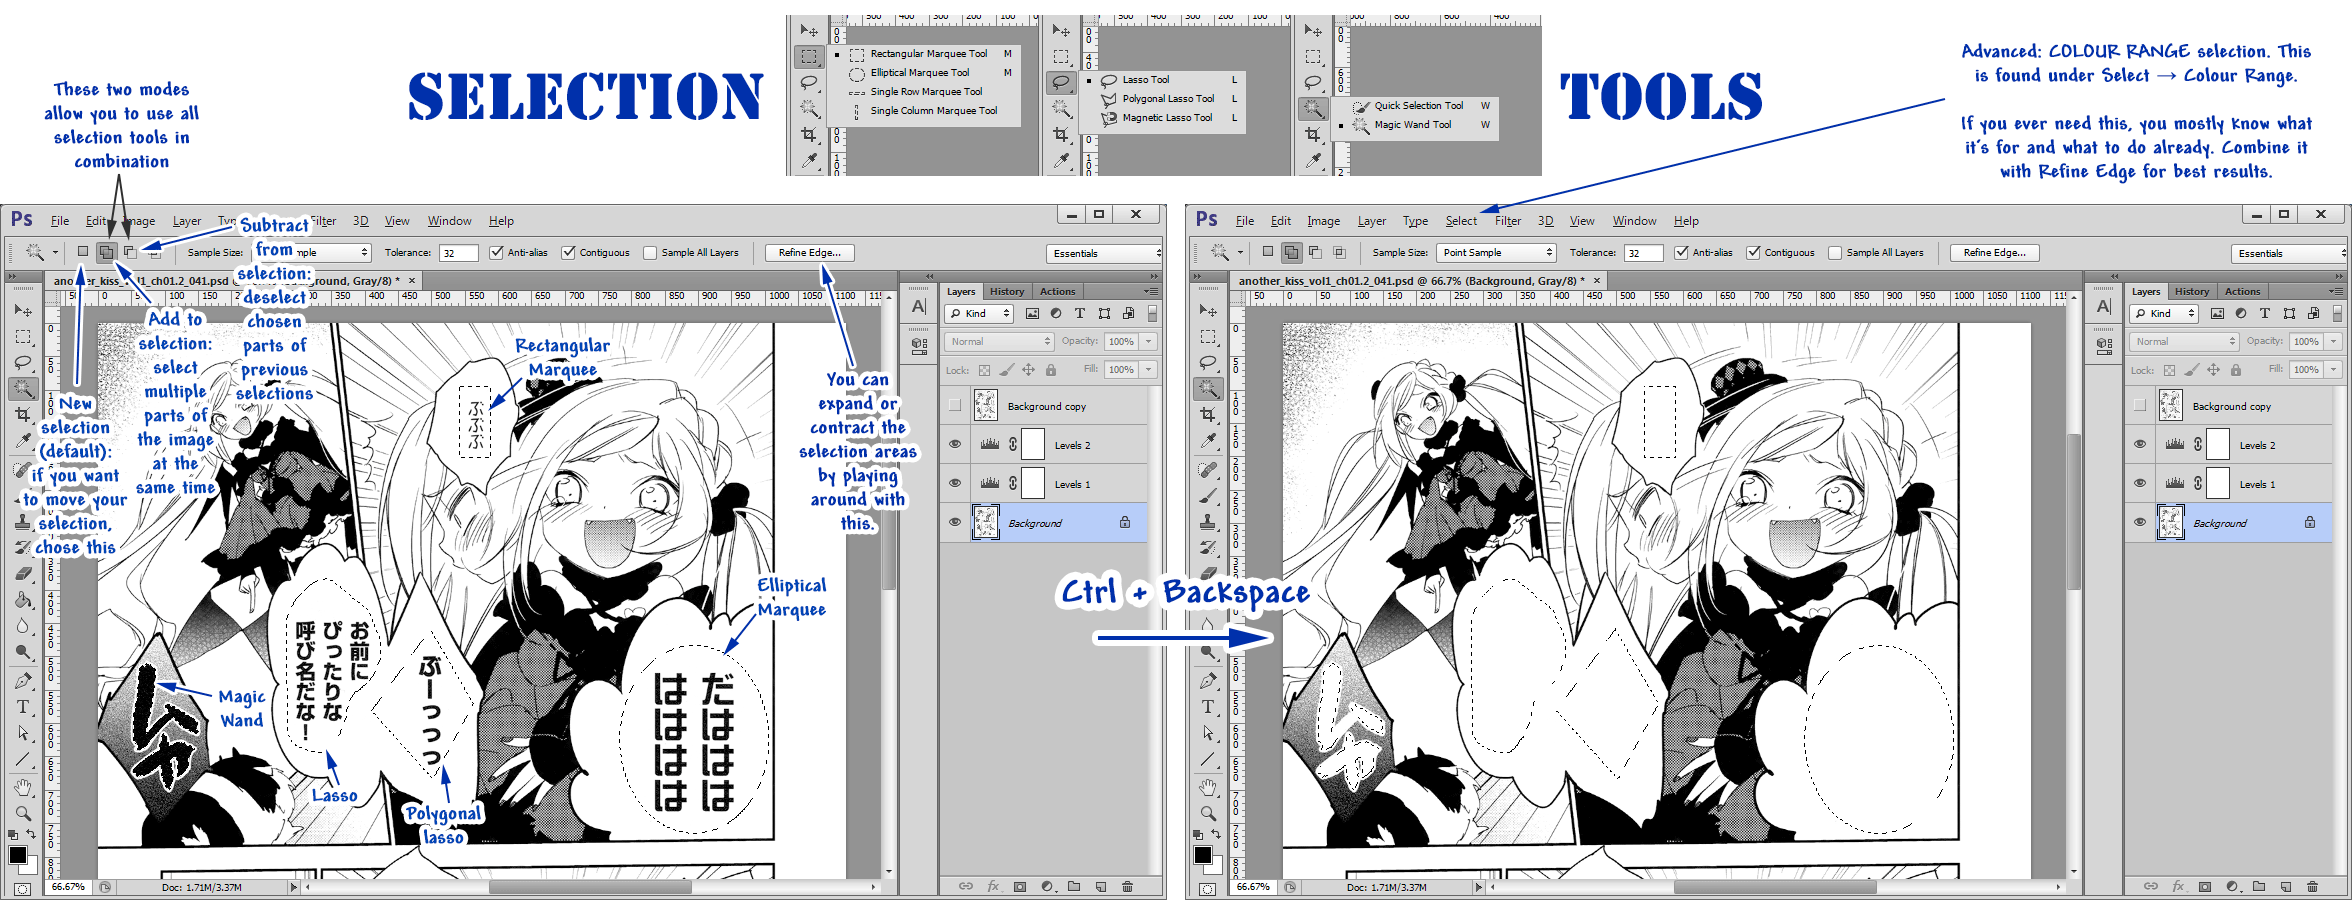
Play around with all Selection Tools, they'll all come into use very often. Use "Add to selection" or "Subtract from selection" option to use these tools in combination. Use Refined Edge to contract/expand the selected areas.
Clone Stamp
[explanation]
Content-Aware:
With Photoshop CS5/CS6, you'll have this automatic redrawing option. Select roughly the areas that need redrawing with Selection Tools → Edit → Fill → choose Content-Aware → OK. If you follow this guide and edit directly on the Background layer, you can hit the Delete keyboard to open the Fill dialogue. Since this is automatic, the redrawing won't always work nicely and you have to fall back on Clone Stamp method.
Selective Content-Aware
Advanced. When simple Content-Aware Fill doesn't work, you can make the program smarter with 2 tricks: Masking, and Patch. Please put up with these two videos until I find the time to write an explanation myself.
4. Adding Text
Before adding text:
|
Make sure you're currently having these settings: font that you will use for the normal speech bubble; Anti-alias (either Smooth, Sharp, or Crisp); Center align; the uppermost Leveling layer is being chosen ((this ensures your text will stay above this layer, but under the Background Copy)).
Adding text
Start drawing text box and copy/paste all translation one by one in their reading order. After you pasted one text, click on the Leveling Layer before drawing the next text box ((with this method, all the text will appear in a top-to-bottom order in the Layers palette)).
Do not bother with changing font and size for different text types yet. just put them in their general position. Regularly check back with the Raw ((turn on the visibility of the duplicated layer on top)) to make sure you didn't forget to add any text.
Keep all the text layers above Leveling layer, or else you'll level them too.
Text box:
|
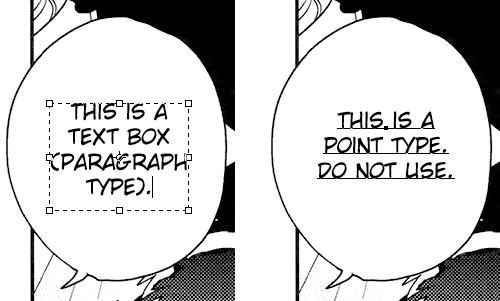
Use text box (paragraph type) to add text. Do not use point type.
5. Styling Text
Character palette:
|
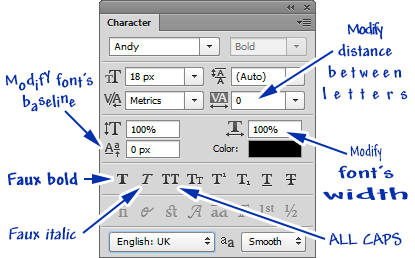
Useful features: Faux Bold, Faux Italic, All Caps, Modify Font's Width, Modifying Font's Base Line, Modifying Distance Between Letters.
Font
There are different types of text in manga that require different fonts: normal speech, narration, thoughts, handwritten text, SFXs, shouting, emotional speech ((spoken when the character is embarrassed/weak/excited/trembling/moaning/etc)). Here are some common fonts that I use: [Download]
Size
Use consistent size for text of a same font, try to only fluctate around +/- 3px if required. Do not make the text as large as possible to fill up the bubble, but not too small either. [image]
Positioning
Text should be centered horizontally and vertically inside a bubble/box. The text shape should conform to the shape of bubble/box [image]
Warp Text
Very useful for styling, especially for SFX and screaming/moaning speech. Try to make use of Horizontal and Vertical Distortion too. [image]
Stroke:
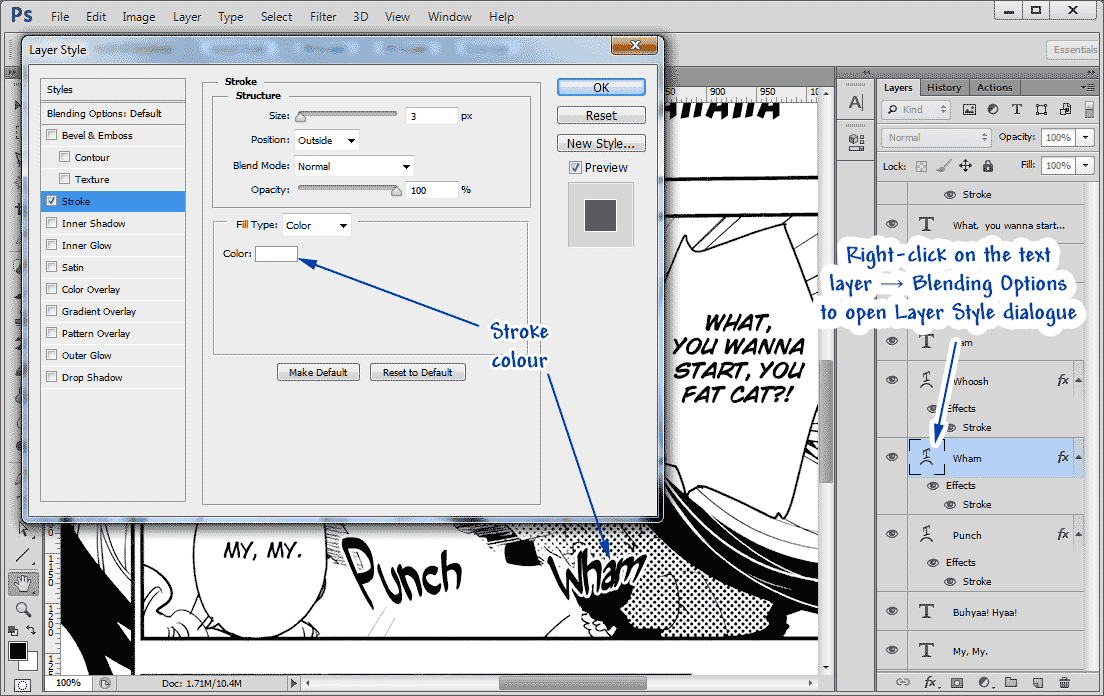
White outline for black/gray text, or black/gray outline for white text. Right-click on the text layer → Blending Options → Stroke → choose Colour and Size for the outline → click OK. I keep 2 records for this action: "Stroke White 3px" and "Stroke Black 3px".
Pattern Overlay
Can be found in Blending Options just like Stroke. This fill up the text or any other type of layer with your desired screentone. Usefull for SFX. [image] [screentones and dot patterns.pat]
6. Resizing and Exporting
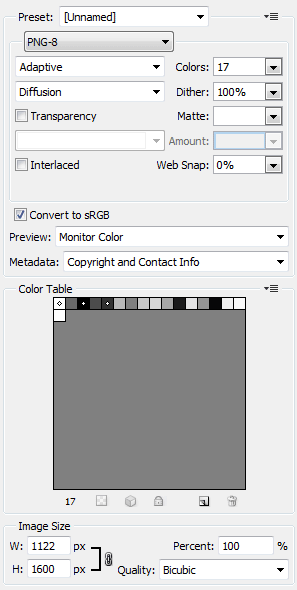
PNG-8 32 colours:
|
These settings are recommended for editors who use only Photoshop to export images and no other program for post-optimization: File → Save for Web → choose “PNG-8”, “Adaptive”, “Diffusion”, type in 32 for “Colors”, “Dithers” 100%, uncheck "Transparency" → "Image Size" type in 2000 for Height ((don't enter anything for Width)), "Quality" Bicubic → click Save.((If you're recording this action, do not change the file name, otherwise all of your saved files later on will be changed to this name.))
PNG-4 16 colours
Since Photoshop can't export 4-bit PNGs, you would need an extra program in order to produce PNG-4. An example is ImageMagick.
ImageMagick offers an alternative color reduction method which may be more efficient. In Photoshop, export 256-colour PNG-8 images from your psd files and use this Windows Batch script (save as .bat) by dragging & dropping the PNG files on top of it. It will change the 256-colour 8-bit files to 16-colour 4-bit files (with mogrify.exe).
